

| 36.5"x36.5" | Jelly Roll Jam | Cuzco Jelly Roll |

The Jelly Roll Jam is so easy to make and would be great for a quick baby shower gift, especially if there are twins involved! The pattern gives you two quilts, so with materials bought on sale it was a relatively inexpensive gift to make. The pattern is available for free at Fat Quarter Shop's website. I decided to divide up my Cuzco jelly roll into purple/pink/white and blue/orange/yellow color groupings. The blue/orange/yellow one is my favorite, because it reminds me of a koi pond!
I made this quilt so I could practice my FMQ skills and it is the first quilt that I put on my Gracie Queen frame. It is always more fun to practice on an actual quilt and it is less upsetting to make a mistake on a quilt that doesn't require a huge time investment!

I sewed the leftover scraps together to create the backing strip. There were a few whole jelly roll strips left too, so that is what I used to surround the scrap strips. I also used three Kate Spain half yards and one solid half yard for the backings.

I cut rounded corners, because there are so many straight lines in this quilt. I chose binding colors that bring out the most calming parts of the quilt, which is important in such a print heavy quilt! I am guessing at the actual colors, but I used a fat quarter each of Quilter's Linen in Thistle and Tiny Diamonds in Teal.
Note on the Tiny Diamonds: I tend to stay way from checkered or gridded fabrics for bindings. Those patterns can give the illusion that the binding is twisted or bulging, if you don't pay careful attention to your cutting or if something about the print makes it difficult to cut in a way to avoid the distorted look. You can see this effect on my first Twister Quilt. The Tiny Diamonds print doesn't bother me in photos because it is tone-on-tone and reads like a solid, but it does bug me in person! Just something for me to remember in the future!

With this 36"x36" quilt, I think it took longer to load it into the frame than to quilt it! I used a large stipple, but it is a little hard to see. If you click on the images above, the quilting can be seen most clearly on the yellow and pink backing fabric.
| There is a window seat behind the machine, which has been great for holding supplies. |
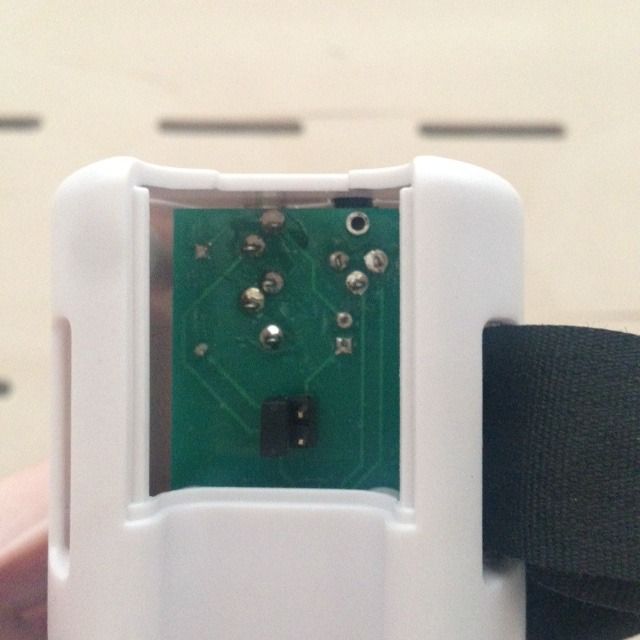
I bought the frame and sewing machine at SewVacDirect in Bryan, TX. I was so excited when I picked a place to buy the machine and it turned out the physical location was only an hour drive away! The customer service is really great and responsive. When I finished setting up the leader cloths and had a practice quilt loaded, I pushed 'ON' button and...nothing! There was a problem with the Speed Control, the controller attached to the handle that takes the place of the foot. I called SewVacDirect and they were ready to ship me a new Speed Control immediately. I reached The Grace Company before the new one was shipped and it turned out that in the black cap on the circuit board was on the wrong set of pins. So I moved the black cap over and it worked! I really appreciate the speedy response from both companies!
Some resources that have helped me a long the way:
Frame Quilting @ Piecemeal Quilts (post + comments)
Wenda Coburn: Confessions of a Short Arm Quilter + Online Store. I also bought her ebook Short Arm Quilting.
A New Look at Long Arm Quilting (Free Craftsy Class) - This class is on a long arm, but still helpful!
Gracie Queen Frame YouTube Video
Fabri-Fast Fabric Installation Guide
Leader Cloths - There are pre-made leader cloths available, but I decided to make my own because of the inconsistent reviews on Amazon.com and the pre-made ones are fairly expensive. Ticking stripe was universally recommended, so I used Vertical Ticking Stripe Black/Ivory Fabric. It is 54" width so I only needed 3 yards, which I cut into three long pieces of varying heights (approx 10", 18", 24"). The ticking stripe is printed on a sturdy cotton duck and the straight lines are helpful! The instructions for making leader cloths are in the frame instruction manual. JustSewOlivia has a really helpful post with great pictures. I did not have to use velcro, because my cloths 'snap' in with plastic tubing.
I pin my quilt to the leader cloths with flat flower head pins.
Practice: My first practice piece was just a large generic purple solid top and a large generic purple solid back and white thread. The white thread on dark solid made it easier to catch and fix any beginner's mistakes quickly. It also helped me get a feel for the quilting movement, without having to worry about unpicking threads. I did use a seam ripper on the practice quilt or the Jelly Roll Jam quilts. It is not helpful for me to focus on perfection when learning. At this point, I am focusing on becoming comfortable with the machine, the frame and my technique.
Pros: • It makes quilting so much easier and faster! The carriage moves so smoothly and the quilting movement is much more natural for me. • Not having to baste is awesome! • I don't feel intimidated by my stack of large quilt tops anymore. The work area for the queen setup is 84". • There are upgrade options for the frame. The carriage will fit most machines with up to an 18” throat (foot pedal and power cord have to be separate). If I ever wanted to quilt larger quilts, there is a king expansion set available. • The Grace Company has many helpful YouTube videos. • I get less stressed out about mistakes, since I am further away from the quilt when quilting.
Cons: All these are relatively minor for me: • Lining up the quilt top with a pieced backing is slightly harder. It is easy to center the top and backing horizontally on the frame, but a bit harder vertically. I did pretty well with the baby quilts in this post, but one of quilt tops did end up an inch higher than I wanted. Of course, that is a huge deal to no one but me! • I have to add a few more extra inches to the backing than I did previously. • It is a little more challenging to fix mistakes, when you can't quickly rip the quilt away from the machine and head to the couch!
Limitations - The Grace Machine Quilting Frame is ideal for sewing machines with up to an 18" throat. My Juki-TL2010q has a 8.5" throat size (from needle to the inside of the machine). The biggest limitation is throat size. Since the finished quilt is rolled onto the take-up rail inside the throat, the available quilting space becomes more limited as you work on the quilt. When choosing a quilting design, you really need to consider the space that will be available during the whole quilting process. Also, you don't want to accidentally bump into the back of the machine while quilting! I have been choosing a seam line as a "Do Not Pass" point.
From the Gracie Frame Machine Quilting System Manual: "With a sewing machine that has a 9" throat, you would be able to sew a pattern up to 7" for your first row of patterns prior to having rolled any fabric onto the take up rail. By the end of your quilt the largest pattern you can sew would be reduced to as little as 4" depending on the batting thickness and length of the quilt that is rolled on the Take-up Rail." I have seen a few people mention that they will flip the large quilt halfway through and work in reverse, so at maximum only half of the quilt ends up in the throat.
Quilting issues I have had so far:
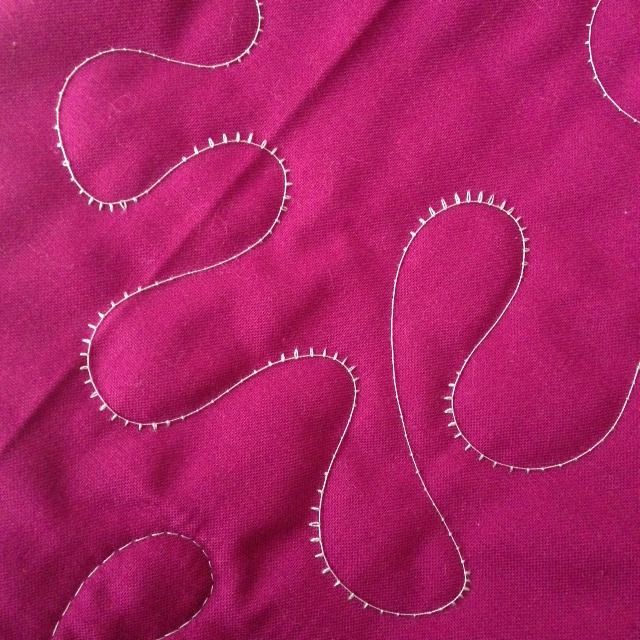
- When I was quilting on my practice quilt, I noticed that there were thread eyelashes all over the back! I tried so many things to fix it, but it ended up being the most simple thing. I had been forgetting to put the pressure foot down!
- I am having a little bit of problem with quilting on the edges, even while basting. Leah Day has several recommendations to avoid this issue and one is to make the border a little too large (so you can start your quilting an inch or so in) and trim down later. Another quilter recommended spraying a little fabric adhesive under the edges. I haven't tried either of these tips yet, but I will on on my next quilt.
- Lighting - While I had no difficulty when practicing on solids, I did have trouble seeing my quilting on the very busy Jelly Roll Jam quilts. I bought a LED lamp with a clamp at Lowe's and I will be experimenting with it and possibly other lighting options.
- I didn't even think about using rulers with this machine, but I discovered that I can! You just have to be mindful of the ruler size. Wenda Coburn has a list of rulers that are appropriate for a short-arm. I bought a ruler foot for my Juki, but it appears that you can also buy a teflon attachment to convert your regular quilting foot into a ruler foot.
- I was under the impression that you had to have the Gracie King attachment to have a batting rail, but it appears that AllBrands has a batting rail for the Gracie Queen. Right now the extra batting just drapes on the floor, rather than being rolled up like the backing and quilt top.
- The Gracie Laser for pattern tracing.
Overall, I have had a good experience so far! The pros outweigh the cons and I am more excited about the actual quilting now. I will probably add more information to this page in the future, as new things come up. If anyone has any frame quilting tips or suggestions, feel free to leave them in the comments!
I will be linking up with Fabric Frenzy Friday at Fort Worth Fabric Studio, Thank Goodness It's Finished Friday (which is being hosted at Quilt Matters this week), Show off Saturday at the Sew Can She blog and Sew Cute Tuesday @ Blossom Heart Quilts! The Jelly Roll Jam quilts are one of the projects listed on my 2015 Q1 Finish Along list. The 2015 Finish Along is hosted by Adrianne @ On the Windy Side.
I will be linking up with Fabric Frenzy Friday at Fort Worth Fabric Studio, Thank Goodness It's Finished Friday (which is being hosted at Quilt Matters this week), Show off Saturday at the Sew Can She blog and Sew Cute Tuesday @ Blossom Heart Quilts! The Jelly Roll Jam quilts are one of the projects listed on my 2015 Q1 Finish Along list. The 2015 Finish Along is hosted by Adrianne @ On the Windy Side.
10 comments so far. What are your thoughts?
How exciting for you! I really enjoyed reading about your experience. Good luck with quilting your quilt tops.
Fantastic! I love the brightness of Kate Spain, I think I have a charm square pack of Cuzo tucked into my KS collection! I LOVE the rounded corners, it definitely something fun that I think you did so well!
Great review, and kudos on your thought process. It's often less about the size (or $$) of the toy and more about making the most of what you have. Sounds like you're well on your way to using it to its best advantage. Good luck, and have fun! You already have good instincts - love the rounded corners!
Wonderful summary of your experience and I hope it helps others out in the future. The two practice quilts look wonderful, and I love your description of a Koi pond... it's all I can see now, too! :)
The rounded corners caught my eye... love that idea and maybe (just maybe) I will have the courage to try that sometime. What is kinda cool is that my own top finish (almost ha) is the same pattern, from the same place, as yours! I love jelly rolls to!
Woo hoo! Very cute quilts, Taryn. Thanks for sharing your experience with the Gracie Queen -- it's great to understand the pros and cons.
Great review and a couple of gorgeous quilts!
This wwas lovely to read
wonderful
This blog always gives me something to think about.
Post a Comment
Thank you for commenting! If you are not logged in via a Blogger account or your Blogger account does not show your email, don't forget to leave an email address!