


(Edit 1/25/2018: In process of replacing Photobucket images) Welcome to my blog! My name is Taryn and I just started sewing at the end of last year. I was a graphic designer for a regional retailer for 6ish years. I designed 20 page ads in the Sunday paper, among other things (those of you in TX, LA & OK may have seen my work ;D).
My husband worked overseas for the first 5 years of our marriage, so we were thrilled when he got a job in Houston, TX last year! I am now a stay-at-home wife and sewing has become my favorite thing to do. I am completely addicted to making quilts! I also love cooking & reading. Well...I say I love cooking, but I really just like looking for great recipes and thinking about making them! [More About Me]


I have a 8.5x5.5 Moleskine Passions Book Journal, but the paper pockets inside are pretty much useless to me! I wanted a book cover with pockets for bookmarks and page markers. This is my solution! Cliff Notes version of instructions are on the picture. If I have anything to add, it is in the text below the picture.
For the outside & inside cover measurements I used Length + 1" & Width + 1.5" (Standard is Width + 1", but it felt a bit too snug to me). The pockets are 2/3s the width of the inside cover.
MATERIALS
• About 4 Fat Quarters of Fabric • Interfacing
• Coordinating Thread • Button • Elastic (I used a Ponytail Holder) • Fabric Glue Stick • Ribbon/RicRac
• Coordinating Thread • Button • Elastic (I used a Ponytail Holder) • Fabric Glue Stick • Ribbon/RicRac
 |
| Click on this image to zoom in. Also, I didn't end up using the batting. It was going to make the cover too thick. |
| CUT: | ||
| Interfacing: 2 - 12.5" x 9.5" Pieces Exterior Fabric: 12.5" x 6.5" Piece for Outside Top 12.5" x 3.5" Piece for Outside Bottom 12.5" Piece of Ric Rac or Ribbon |
Interior: 12.5" x 9.5" Interior Lining 2 - 9.5 "x 4" Pieces of Linen for Big Pocket Outer 2 - 9.5" x 4" Pieces of Fabric for Big Pocket Lining. 2 - 2"x 4" Pieces of Fabric for Small Pocket Binding 2 - 4"x 8.5" Piece of Linen for Small Pocket |
1) To complete the exterior, you need the 12.5" x 6.5" fabric and the 12.5" x 3.5" fabric.
2) Place the two fabrics right sides together, the bottom of the 12.5" x 3.5" piece lined up with the bottom of the 12.5" x 6.5" piece.
3) Sew a 1/4" seam along the bottom edge.
4) Press the seam open.
5) Now that it is all together, you can fuse the interfacing! Place the coated side of the interfacing to the wrong side of the fabric. Fuse according to the directions for your interfacing.
6) Since you are already at the ironing board, go ahead and fuse the interfacing to the back of the 12.5" x 9.5" interior piece as well.
7) Place Ric Rac/Ribbon on the line created by the seam on the right side. I used a fabric glue stick to keep it in place.
8) Sew down the middle of the Ric Rac. I used the same color thread so it would blend in, but you could also use a contrasting thread!
9) The exterior of the book cover is now complete!
1) For the small pocket binding you need the 4" x 2" pieces of fabric.
2) Fold both in half lengthwise. Press.
3) Open them back up. There will be a crease in the middle. Fold the top to the center line. Press. Repeat for second strip.
4) Fold the bottom to the center line. Press. Repeat for the second strip.
5) Fold the binding in half lengthwise. The strips should now be 4" x 1/2."
6) For the small pocket, you need the two 9.5" x 4" fabric pieces.
7) Fold the small pocket piece in half. It should now measure 4.75"x 4" with the fold at top.
8) Place the small pocket inside the binding. The fold of the pocket should be inside the fold of the binding. Repeat for second pocket.
9) Edge stitch the binding onto the pocket. I have a little trouble with edge stitching, so I sometimes use my narrow/rolled hem foot. Because of the little guide on the foot, It helps me get a perfect 1/8"! Repeat for the second pocket. The small pocket is now complete!
1) To construct the big pocket you need: 9.5" x 4" Linen (x2), 9.5" x 4" Fabric (x2) and the small pocket.
2) Place the wrong side of the small pocket to the right side of the linen. Repeat for second pocket.
3) Place the right side of the fabric piece on the ride side of the pocket/linen combo. Repeat for second pocket.
4) For the pocket on the left, you need to sew a 1/4" seam on the right side.
5) For the pocket on the right, you need to sew a 1/4" seam on the left side. I accidently sewed both of them on the right side and had to break out the seam ripper!
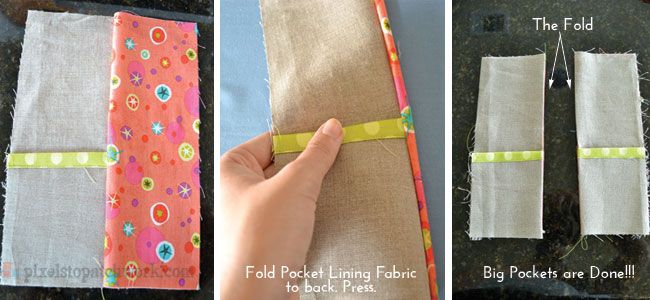
6) Fold the pocket lining to the back and press. Repeat for the second pocket. The left side pocket will have the fold on the right. The right side pocket will have the fold on the left. The big pockets are now done. It is time to start constructing the book cover!
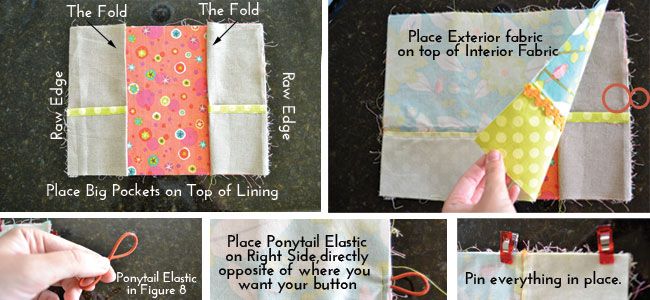
1) Place the big pockets on top of the lining. Make sure the folds of both are facing the inside and the raw edges are on the outside.
2) Place the exterior fabric on top, right sides together.
3) If you are putting a button, place the elastic in between the interior and exterior pieces. You should place it on the right side, directly opposite of where you want your button. I used a ponytail elastic that I put in the shape of a figure 8.
4) Pin everything in place. I used clips. They held everything together really well!
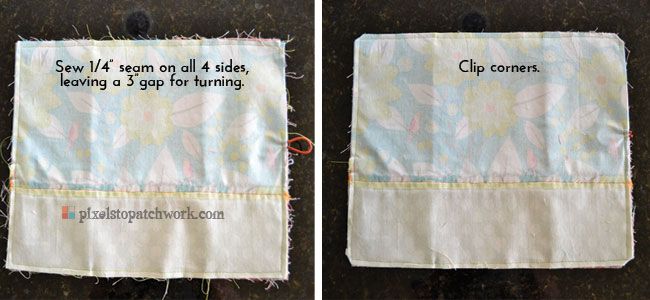
5) Sew 1/4" around all four edges, leaving a 3" gap for turning. Don't forget to backstitch at the beginning and end!
6) Clip corners. Cut the elastic at the seam and trim off any fraying threads. I had a lot!
/main3_pixelstopatchwork.jpg
7) The fun part! Turn it inside out. I usually use a gigantic chopstick to push out the corners, but I couldn't find it today under the mounds of fabric that the Patchwork Prism has created. I used a knitting needle today, and it worked great. I pressed it at this point as well, it was pretty wrinkly!
8) Blind stitch the opening closed. (Just like I do quilt binding)
9) Attach a button to the front, directly opposite from your elastic. I used a Dritz Cover Button Kit that I bought at Wal-Mart so I could make my own button!
 |
| Finiahed! |
Fabrics Used:
Blue-Green Cover: Cary Phillips Floral Folio Aqua Large Florals, Michael Miller Ta Dot in Orange, Cary Phillips Floral Folio Dark Orange Lots of Dots
Blue-Green Cover: Cary Phillips Floral Folio Aqua Large Florals, Michael Miller Ta Dot in Orange, Cary Phillips Floral Folio Dark Orange Lots of Dots
Gray Book Cover (Picture of Inside): Kawaii Honolulu Town in Grey, Michel Miller Dumb Dot in Gray, Lizzy Pilgrim Dusty Blue Stripe, Charcoal Linen
I am linking this up in the Bag & Accessories Category at Ellison Lane Quilts Summer Sewing Contest. Be sure to check out all the great entries in all of the categories!
I am linking this up in the Bag & Accessories Category at Ellison Lane Quilts Summer Sewing Contest. Be sure to check out all the great entries in all of the categories!

How Long Have You Been Quilting? About 6 months! My mom didn't sew, so I didn't grow up around it. I just randomly decided I wanted to learn, so I started teaching myself to sew at the end of last year. Last December, I made a rag quilt from a kit and I was hooked!
Favorite Quilting Tips:
- Think twice, then measure twice, then cut once. (I got this from Bethany at Make Me a Quilt! I always forget the thinking part :D)
- It's a walking foot, not a running foot. (from one of the quilting forums)
- 10 Things I've Learned in the 2 Years Since I Graduated from Art School (Warning: Bad Language) - Not exactly quilt specific, but a lot of it applies; particularly #5 on inspiration!
Favorite Fabric : This one is hard, because everytime I see a new line it is my new favorite! I just bought some Evergreen Andalucia II.
Favorite Craft Book: Sewing in No Time: 50 Step-by-Step Weekend Projects Made Easy by Emma Hardy. It has a lot of quick, fun projects.
Book I Am Currently Reading: I am reading Adland: Searching for the Meaning of Life on a Branded Planet by James P. Othmer. It is hilarious and I recommend it to anyone who works in advertising or wants to work in advertising!
Favorite Children's Book: This is more of a young adult book, but I will always have a special place in my heart for The Giver by Lois Lowry.
Favorite Quilting Tool: June Tailor Perfect Half-Square & Quarter Square Triangle Ruler. I HATE trimming HSTs, but for some reason having a special tool for it makes it far more enjoyable. I also like my little ironing board. I bring it in the living room and do mass ironing in front of the TV.
Favorite Music to Listen To While Quilting: I listen to Colbie Callait Radio on Pandora. Acoustic lady music, relaxing and unobstrusive!
Favorite TV Show While Hand Stitching: Netflix is great for this! Right now I am watching Samantha Who. Last series was United States of Tara.
Binding - by hand or by machine? I *love* hand sewing the binding. It allows me to be lazy and productive at the same time!
I originally wrote this post for the Let's Get Acquainted Blog Hop. I have met so many great & talented bloggers during this hop, I hope you will hop on over and meet some of them too! The latest news on the blog hop is over at Plum and June. Jennie from Clover & Violet did a fantastic guest post with some great advice for new bloggers AND a giveaway! Don't forget to check out the following blogs on the hop!
| June 7 Cinzia from Deux Petites Souris Kristy from Quiet Play | June 7 Em from Sewing by Moonlight | June 12 Kelly from Jeliquilts Yzo from Chez Roo |
Thanks so much for stopping by!
50 comments so far. What are your thoughts?
Taryn,
Great tutorial!
Fantastic job, Taryn! Love the way you organized your tutorial...so easy to follow, and the pictures are fabulous. Beautiful work as always!
Great tutorial. What a good idea to have a little pocket included!
I'm so with you on hating trimming HSTs (does anyone actually enjoy it?!). Maybe I need one of those rulers to make it easier!
Great post Taryn, I love the fabrics you have used in your book cover! I agree with you that the paper pockets on the Moleskine journals are hopeless, so will definitely put this project on my (expanding) to-do list, thanks!
Hiya, already a follower, but pleased to stop by on the hop!
Hi Taryn, nice to meet you! Loved your post especially '10 things ...in art school'. I especially love #6...lot of people, young and old, need to learn that.
Thak you for sharing a part of you. I'm becoming a follower!
Loved learning a bit more about you! What a great tutorial too - love all the pictures! Have a great weekend!
What a fun post! Great to 'meet' you and what a lovely project & tutorial you shared!
Aww, you so sweet for mentioning me. :P
I have a hardcover copy of The Giver on my bookshelf, it's such a wonderful story. I treasure books the same way I treasure fabrics, I just love collecting my favorites and looking at them. :)
You put together an amazing tutorial - it's really well done, very easy to follow, great pictures. Your graphic design talents are represented well today! I've been thinking about making a cover for my kindle so this was inspiring.
It was great to get to know a little more about ya! :)
Love the layout and design of your blog. I only wish mine could look half this good someday :)
I also love that robot! It is on my to-do list.
What a great project. I love that fabric you used on the gray cover. May have to get myself some of that!
Looks like a brilliant tutorial for a brilliant book cover! So happy to be on the Blog Hop with you :)
what a fun project, thanks for sharing.
Love the idea of a reusable book cover! Thanks for a great tutorial.
Fabulous tutorial! You've made some wonderful quilts too (in only 6 months time!). I am glad to learn a little more about you through the blog hop. :)
I'm enjoying the blog hop more and more with all the tutorials .. even though there are far too many to make them all right now. I already knew your robot but the owl is new to me - it's a nother great pixely quilt!
SUCH a well put-together tutorial. Bravo! Also, I can't, won't, don't believe you've only been quilting 6 months. Are you a quilting savant? :)
Thanks for the tutorial!!
What a lovely, detailed tutorial! Love your work :)
Nice job with the tutorial. Welcome to the wonderfully addictive world of quilting. I was also a graphic designer for several years before turning to quilting.
Great post Taryn! It is great to learn more about you. And I love your tutorial. This is definitely going on my to make list. And I like the very "pin-able" image you created - that's awesome! I haven't seen that Kawaii fabric before - super cute! Thanks for participating.
Very nice tutorial, just pinned it on Pinterest! You already know I love you blog and follow, but I will tell you again :)
So nice to know more about you Taryn. I love your Charlotte and Owl quilts - one of the first projects I made was the Snuggly layer cake throw. Thank you for the great tutorial!
Thank you for a great, clear tutorial! Nice to meet you via the blog hop.
Wow, great tutorial! Nice to meet you :o)
Thanks for sharing your tips (and the tutorial), Taryn. "Just do it" really doesn't just apply to running shoes. Good to get that reminder.
Hey Taryn, it's so cool to meet you and find your blog! Were you named after a harlequin romance character? I new a Taryn way back who was, so just wondering!
What a cute book cover! I'm a new follower, over from the blog hop :)
Great pictures on the tutorial! Thanks for doing it.
Nice book cover, I wanna try do that sometime. Have a great weekend.
They are beautiful, and very bright and happy! I am preparing a blog post about more monthly makes later this week would you mind if I borrowed the photo from here and linked back to you? I'm the monthly make administrator for June AKA Miss June :0) xx
Love your book covers and the fabrics are so cute...
Very well done tutorial! Ever think about trying out for Moda's Bake shop, Riley Blake's Cutting Corners Collage, or Art Gallery's open spot for the Fat Quarter Gang?
I'm a little late for blog hopping, but loved your book cover! It looks really pretty!
Late to the party but great tutorial! Definitely one I'll try.
Great post Taryn and very cool tute! Mine is going to look terrible compared to that ;-)
Great tutorial, and i love the fabric that you chose. I can't believe you've only been sewing for 6 months, your work looks really professional.
Great tutorial! I just found your blog via the hop and I love it. You did a great job designing everything. Did you do that yourself? I look forward to following you!
I know I'm a bit late but trying to catch up. Nice tutorial and thanks for sharing.
Fantastic tutorial - thanks for sharing it!
I am catching up with the Plum and June blog hop:). Very pretty book covers! Your blog has such a pleasing look, too.
I found you via Sew Can She...I also just recently started sewing and didn't grow up around it. I have gotten a ton of help from my local quilt shop "The Scrappy Quilter" in Schertz, Texas. I am going to follow you in by google reader!
Greattutorial and love the pocket idea! Thanks for sharing! Love surfing your blog and I'm your newest follower =)
Love the book cover tutorial, thanks for sharing :) ChrissieD (late newcomer to P&J's LGA Blog Hop)
What a cute book cover!!! It's amazing all the creative people on the hop. Well done :) Are you going to Quiltcon?
I need this while I was in school. We had to cover our books. Bet my nieces would like this. Thanks!
Thank u so much for the free pattern of bookcover. Very sweet and very sweet of you as well
very nice idea Thanks
F7E37FBD7E
kiralık hacker
hacker arıyorum
kiralık hacker
hacker arıyorum
belek
F2D322DB
Şırnak Esçort
Mardin Esçort
Adıyaman Esçort
Ardahan Esçort
Trabzon Esçort
Sivas Esçort
Rize Esçort
Aydın Esçort
Artvin Esçort
Post a Comment
Thank you for commenting! If you are not logged in via a Blogger account or your Blogger account does not show your email, don't forget to leave an email address!